Difference between revisions of "Using Upgrades Generator (rFactor2)"
| (3 intermediate revisions by one user not shown) | |||
| Line 1: | Line 1: | ||
[[File:RFactor2.png|300px|right]] | [[File:RFactor2.png|300px|right]] | ||
| − | This is a basic guide on how to add settings from the GPVWC Upgrades Generator to a Superleague test mod. | + | This is a basic guide on how to add settings from the GPVWC Upgrades Generator to a Superleague/Superleague Lights test mod. |
== Step 1 == | == Step 1 == | ||
| − | Download & install the | + | Download & install the 2022 Superleague/SL Lights Test Base Mod: [https://drive.google.com/file/d/1dB4PV2enatHaXMGfqaQYJg2xFIvaZsyk/view?usp=sharing GPVWC22_SL_TCar-v1.rfcmp] |
| − | Also download the base upgrades | + | Also download the base upgrades files: [https://drive.google.com/file/d/13kh-DHXQ0d3dpZKy45Dc8scVJwtGZX2Q/view?usp=sharing Superleague 2022 Upgrades File] / [https://drive.google.com/file/d/12lFQ_LWFB4kbY9hSk9iRQGdJHAiBA3Ry/view?usp=sharing Superlights 2022 Upgrades File] |
| − | ''Optional: Download the vehicle description file if you want customise the vehicle name & class'': https://drive.google.com/ | + | ''Optional: Download the vehicle description file if you want customise the vehicle name & class'': [https://drive.google.com/file/d/1PZgNWgScR9nVdoxQtDJLBzPV_Dlvzn3x/view?usp=sharing Superleague 2022 veh file] / [https://drive.google.com/file/d/1iAbltg1_6Kbz9-OYVtZMQ1pO_6O4JMjX/view?usp=sharing Superlights 2022 veh file] |
== Step 2 == | == Step 2 == | ||
| − | + | Open the upgrades generator spreadsheet for the series you want to modify: [https://docs.google.com/spreadsheets/d/1A5IEzCVyfv8mG97AZAgQECzsGt29V9l-w9Li2yVY0yg/edit?usp=sharing Superleague 2022 Upgrades Generator] / [https://docs.google.com/spreadsheets/d/1x_nf77aLQGVCM48KAwlwt3EKgEehgy-CFt6rApAN5qA/edit?usp=sharing Superlights 2022 Upgrades Generator] | |
| − | + | Once opened you'll want to either create a copy or download the file in your preferred format. If making a copy please make sure to set the local settings for the spreadsheet to either US or UK in order to ensure the decimal points work correctly. | |
| + | |||
| + | Next open the base upgrades file in a text editor such as Notepad. In the base upgrades file find the section at the end of the file labelled UpgradeType="Car Upgrades". Replace the section starting with //Upgrades Data Starts and ending with //Upgrades Data Ends with the text in the Output tab of the generator spreadsheet and save the file (keeping the original filename). When adding upgrades always try to ensure that the number of open and closed brackets in the upgrade section remain equal. | ||
[[File:Upgrades1.jpg|500px]] | [[File:Upgrades1.jpg|500px]] | ||
| Line 22: | Line 24: | ||
Open the rFactor2 MAS Utility (Program Files\Steam\steamapps\common\rFactor2\Support\Tools\Mas2.exe). Drag and Drop your new upgrades file into the window and a press the square button (highlighted in blue in the image below) to save as a .mas file. This mas file can be named however you wish. | Open the rFactor2 MAS Utility (Program Files\Steam\steamapps\common\rFactor2\Support\Tools\Mas2.exe). Drag and Drop your new upgrades file into the window and a press the square button (highlighted in blue in the image below) to save as a .mas file. This mas file can be named however you wish. | ||
| + | |||
| + | '''Update: To run with the latest physics version also include the files from this archive along with your upgrades file - [https://drive.google.com/file/d/1S17fj5nbH0qvFvcTkMaK_UC3QLlAgoY8/view?usp=sharing TCar Update Files] ''' | ||
[[File:Upgrades2.jpg|500px]] | [[File:Upgrades2.jpg|500px]] | ||
| Line 30: | Line 34: | ||
* Press the package button (highlighted in magenta in the image above) and then choose 'Create Single Cmp Package'. | * Press the package button (highlighted in magenta in the image above) and then choose 'Create Single Cmp Package'. | ||
| − | * Under select component, choose <Add new component> and name it ''' | + | * Under select component, choose <Add new component> and name it '''GPVWC22_SL_Tcar'''. It is important that you keep the component name the same as the mod you are updating. |
* Choose a name and location for the rfcmp package file output. The filename for the rfcmp file can be anything you wish and it is recommended to save it your rFactor2/Packages folder to allow quick installation. | * Choose a name and location for the rfcmp package file output. The filename for the rfcmp file can be anything you wish and it is recommended to save it your rFactor2/Packages folder to allow quick installation. | ||
* In the version section enter your new mod version number (for example 1.01) and then tick the box for 'Update From' and enter 1.0 (the base mod version we are updating) in the box to its right. If you are creating multiple upgrade packages then use a different version number for each one ensuring to always update from the version 1.0 base mod. | * In the version section enter your new mod version number (for example 1.01) and then tick the box for 'Update From' and enter 1.0 (the base mod version we are updating) in the box to its right. If you are creating multiple upgrade packages then use a different version number for each one ensuring to always update from the version 1.0 base mod. | ||
Latest revision as of 18:17, 18 February 2022
This is a basic guide on how to add settings from the GPVWC Upgrades Generator to a Superleague/Superleague Lights test mod.
Step 1
Download & install the 2022 Superleague/SL Lights Test Base Mod: GPVWC22_SL_TCar-v1.rfcmp
Also download the base upgrades files: Superleague 2022 Upgrades File / Superlights 2022 Upgrades File
Optional: Download the vehicle description file if you want customise the vehicle name & class: Superleague 2022 veh file / Superlights 2022 veh file
Step 2
Open the upgrades generator spreadsheet for the series you want to modify: Superleague 2022 Upgrades Generator / Superlights 2022 Upgrades Generator
Once opened you'll want to either create a copy or download the file in your preferred format. If making a copy please make sure to set the local settings for the spreadsheet to either US or UK in order to ensure the decimal points work correctly.
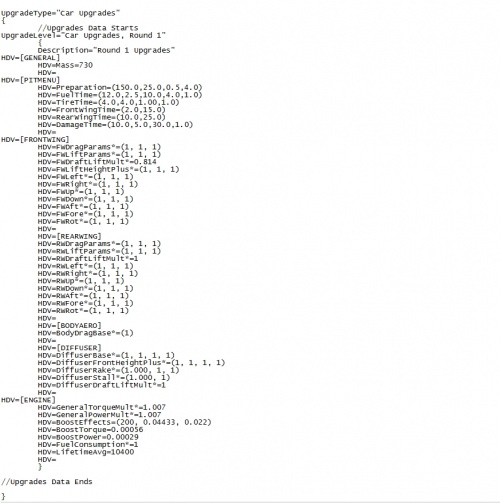
Next open the base upgrades file in a text editor such as Notepad. In the base upgrades file find the section at the end of the file labelled UpgradeType="Car Upgrades". Replace the section starting with //Upgrades Data Starts and ending with //Upgrades Data Ends with the text in the Output tab of the generator spreadsheet and save the file (keeping the original filename). When adding upgrades always try to ensure that the number of open and closed brackets in the upgrade section remain equal.
Step 3
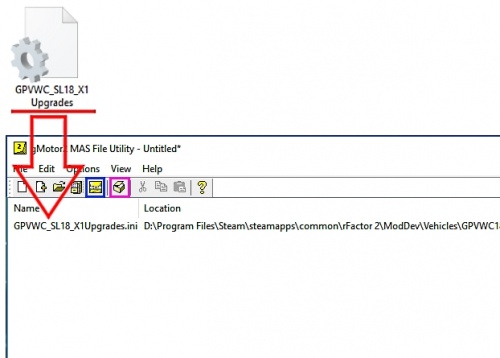
Open the rFactor2 MAS Utility (Program Files\Steam\steamapps\common\rFactor2\Support\Tools\Mas2.exe). Drag and Drop your new upgrades file into the window and a press the square button (highlighted in blue in the image below) to save as a .mas file. This mas file can be named however you wish.
Update: To run with the latest physics version also include the files from this archive along with your upgrades file - TCar Update Files
If you wish to customise vehicle names & class, edit the .veh in your text editor, save and include it alongside the upgrades ini file when creating the update .mas file above.
Step 4
- Press the package button (highlighted in magenta in the image above) and then choose 'Create Single Cmp Package'.
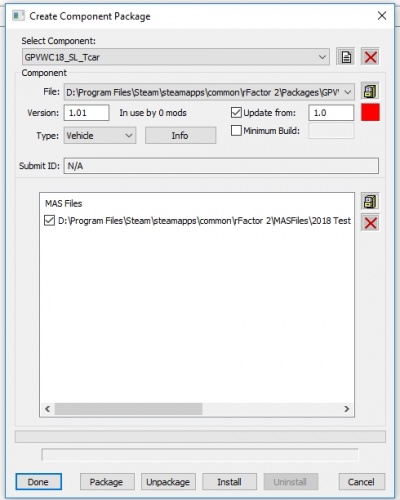
- Under select component, choose <Add new component> and name it GPVWC22_SL_Tcar. It is important that you keep the component name the same as the mod you are updating.
- Choose a name and location for the rfcmp package file output. The filename for the rfcmp file can be anything you wish and it is recommended to save it your rFactor2/Packages folder to allow quick installation.
- In the version section enter your new mod version number (for example 1.01) and then tick the box for 'Update From' and enter 1.0 (the base mod version we are updating) in the box to its right. If you are creating multiple upgrade packages then use a different version number for each one ensuring to always update from the version 1.0 base mod.
- In the 'Type' box select Vehicle.
- Click the filing cabinet icon in the Mas Files section and choose the .mas file you created in Step 3.
- Click package button at the bottom of the window. If you saved the package file to rFactor2/Packages folder you can also install the package in rFactor2 by pressing the Install button. Press Done when you finished.


 del.icio.us
 digg
digg facebook
 googlebookmark
 propeller
 reddit
 slashdot
 stumbleupon